
Is your timber deck looking more grey and green than golden brown? You know it needs a clean, but the thought of blasting it with a pressure washer and causing permanent, costly damage is holding you back. It’s a common fear, and for good reason. There is a right way and a very wrong way when it comes to washing decks. Many people grab the nearest high-pressure hose and hope for the best-a shortcut that often strips the timber’s surface and leads to bigger problems down the track.
We believe in doing things right. This guide gives you our honest, expert advice, showing you the meticulous, step-by-step process to safely wash your deck and restore its appearance. You’ll learn which cleaning products are safe for timber and how to use them effectively. More importantly, we’ll help you understand the limits of a simple wash and identify when your deck needs more than just a clean to be properly protected for the Australian climate.
Before You Start: Assessing Your Deck and Gathering Your Tools
Before you mix a single cleaner or turn on a tap, a proper assessment is non-negotiable. Rushing into a job without understanding the true condition of your timber is the fastest way to waste a weekend or, worse, cause permanent damage. The first step in professionally washing decks is to know exactly what you’re up against. This honest, upfront inspection separates a quick clean from a genuine restoration and ensures you have the right tools for the job.
Dirty vs. Damaged: When is a Wash Enough?
First, get on your hands and knees and take a hard look. Is the problem just surface-level dirt, green algae, or a layer of winter grime? If so, a thorough wash is your solution. However, look for deeper issues that cleaning won’t fix: cupped or warped boards, popped nails, and large, splintered sections. A wash can’t rectify severe sun damage (greying timber) or a peeling, failed coating. These are signs your deck needs a full restoration, not just a clean. Understanding effective wood preservation techniques is crucial for longevity, and it starts by recognising when timber needs more than just soap and water.
Pressure Washer vs. Garden Hose & Stiff Brush
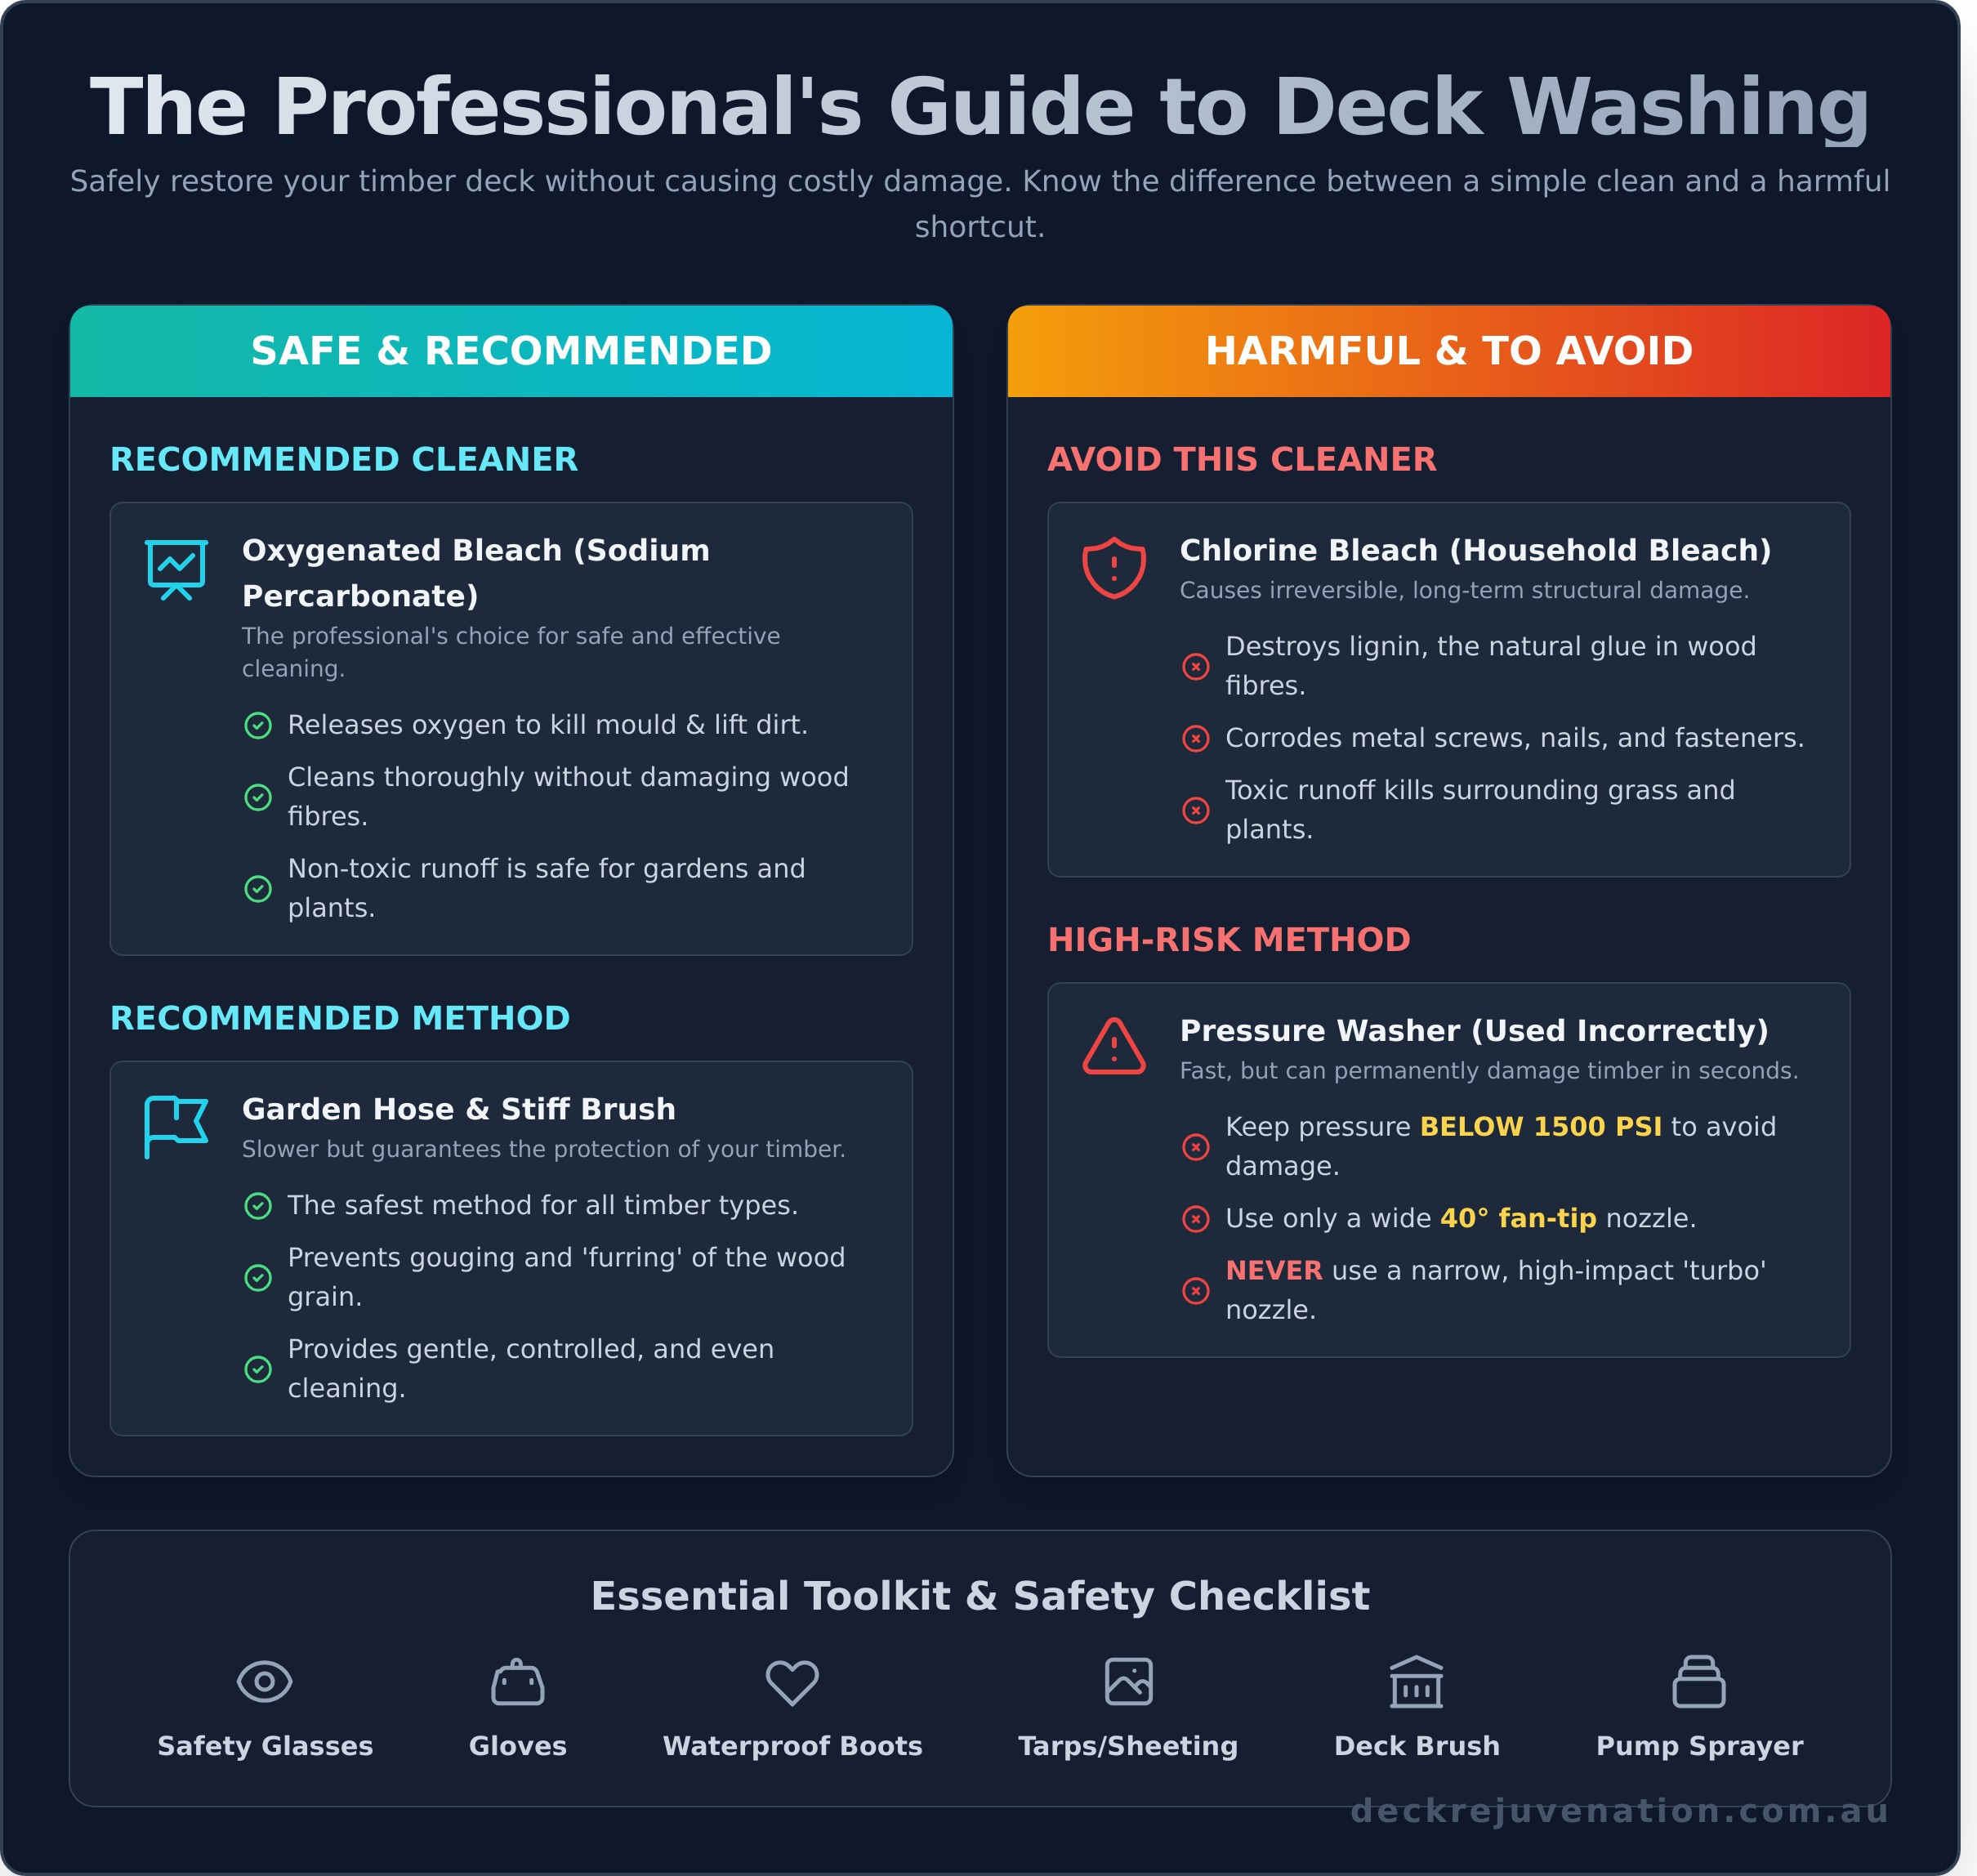
Your choice of tool has serious consequences. A garden hose with a good nozzle and a stiff-bristled brush is the safest method. It’s slower, but it protects the soft grain of timbers like pine and merbau from damage. A pressure washer is much faster, but it carries significant risk. In inexperienced hands, it can gouge the timber, creating a fuzzy, splintered surface known as ‘furring’. If you must use one, keep the pressure below 1500 PSI, use a wide fan-tip nozzle (40-degree is best), and never, ever use a narrow ‘turbo’ nozzle on wood.
Essential Toolkit and Safety Gear Checklist
A professional job requires the right equipment. Don’t start until you have everything laid out and ready to go. Cutting corners here leads to poor results and unnecessary risks. Before you begin, make sure you have:
- Tools: A quality deck cleaning solution, a pump sprayer or large bucket for application, a stiff-bristled deck brush on a long pole, and your garden hose or pressure washer.
- Safety Gear: Waterproof boots, chemical-resistant gloves, and wrap-around safety glasses are essential to protect you from cleaning agents and splashback.
- Property Protection: Have tarps or plastic sheeting ready to cover nearby walls, doors, and delicate plants from chemical overspray.
Choosing the Right Deck Cleaner: What Professionals Use (and Avoid)
When it comes to washing decks, the product you choose is far more important than the pressure washer you use. The wrong chemical can cause irreversible damage, stripping years from your timber’s life. The right one prepares the surface for a flawless finish. We see the consequences of poor choices every week; here’s the honest advice you need to get it right from the start.
Understanding what’s in the bottle is the first step. Most homeowners grab the first “deck wash” they see at Bunnings, but professionals know the crucial difference between a product that cleans and one that destroys.
Why You Must Avoid Chlorine Bleach
Never use household bleach (sodium hypochlorite) on your timber deck. It’s a cheap, aggressive chemical that appears to work by stripping the colour from mould and aged timber, but it’s actively harming the wood. It provides a cosmetic fix that causes long-term structural failure.
- It destroys lignin: Lignin is the natural glue that holds wood fibres together. Bleach dissolves it, causing the timber to become weak, fuzzy, and prone to splintering.
- It corrodes fasteners: Chlorine is highly corrosive to metal. It will accelerate rust on your deck screws, nails, and joist hangers, compromising your deck’s safety. This is a critical point often highlighted in technical documents like the USDA deck building and maintenance guide.
- It harms your garden: The runoff is toxic to surrounding plants, grass, and soil, creating dead patches around your deck.
The Power of Oxygenated Bleach (Sodium Percarbonate)
The safe and effective alternative is oxygenated bleach. Its active ingredient, sodium percarbonate, is a non-toxic powder that, when mixed with water, releases oxygen to kill mould and lift dirt. This is the core component of most professional-grade deck brighteners and cleaners. It cleans thoroughly without damaging the timber’s structure, making it the superior choice for routine washing decks and preparing them for oiling.
When to Use a Commercial Deck Cleaner
For tougher jobs, a purpose-built commercial deck cleaner or stripper is required. These are not for your annual spring clean. Use them when you need to remove a stubborn, failing coating or deep-set oil and tannin stains. These formulations often contain surfactants and potent but wood-safe chemicals designed to break down old finishes. Always choose a product specifically made for timber decks and follow the manufacturer’s instructions to the letter to avoid damaging your timber.
The 5-Step Method for Washing Your Deck Like a Pro
A professional finish comes from a professional process. Haphazardly blasting your timber with a pressure cleaner causes more harm than good and is a shortcut we never take. This meticulous, 5-step method is our blueprint for washing decks correctly, ensuring a deep clean without gouging the timber fibres or leaving a patchy result. Follow it precisely to achieve a uniform, rejuvenated surface.
Step 1 & 2: Clear, Sweep, and Protect
Preparation is non-negotiable. Rushing this stage means you’re just spreading grime around and risking damage to your home and garden. Before any water or cleaner touches the timber, you must set the stage for a proper clean.
- Clear the Area: Remove every item from the deck surface, including all furniture, pot plants, barbecues, and doormats.
- Perform a Thorough Sweep: Use a stiff broom to remove all loose leaves, dirt, and surface debris. Pay close attention to the gaps between boards.
- Protect Your Surroundings: Lightly rinse down adjacent house walls with a hose. Cover any delicate plants or garden beds next to the deck with plastic sheeting to protect them from the cleaning solution.
- Pre-wet the Deck: Lightly hose down the entire deck surface. This prevents the cleaner from absorbing too quickly and drying out, ensuring it works on the surface grime first.
Clearing everything off is also the perfect chance to take stock of your outdoor furniture and decor. Once the hard work is done, you’ll have a beautiful canvas to style. For inspiration, online lifestyle shops like Dutchess Martha offer curated homewares and accessories to help create your perfect outdoor retreat.
Step 3 & 4: Apply Cleaner and Scrub
This is where the real work begins. The goal is to let the cleaning solution penetrate the dirt and lift it from the timber grain. Work in smaller, manageable sections you can complete within 15 minutes to prevent the solution from drying on the surface.
- Mix and Apply: Following the manufacturer’s directions, mix your chosen deck cleaner in a bucket or garden pump sprayer. Apply the solution generously and evenly across one section of the wet deck.
- Let It Dwell: Allow the cleaner to sit and work on the grime for 10-15 minutes. It’s critical that you never let it dry on the timber. If it starts to dry, lightly mist it with water.
- Scrub with the Grain: Using a stiff-bristled deck brush, scrub the timber boards vigorously. Always scrub parallel to the boards, following the direction of the grain to avoid scratching the surface.
Step 5: Rinse Thoroughly and Methodically
Leaving cleaner residue on your deck is a common mistake that can interfere with the performance of future coatings. A thorough, methodical rinse is the final, critical step to ensure a perfectly clean surface ready for the next stage of its care.
- Rinse Completely: Use a garden hose with a standard nozzle or a pressure washer on a low-pressure setting with a wide fan tip.
- Work Outwards: Start rinsing the section closest to your house and work your way outwards, pushing all the dirty water and residue off the edge of the deck.
- Ensure No Residue Remains: Go over the area multiple times until the water running off is completely clear and free of foam or suds.
Costly DIY Mistakes That Can Ruin Your Deck
A pressure washer from the hardware store and a free Saturday seems like a simple recipe for a clean deck. But every year, we’re called out to inspect timber that has been permanently scarred by a well-intentioned DIY clean. When it comes to washing decks, what you don’t know can cost you thousands in repairs.
Here are the three most common mistakes we see, and why a bit of professional know-how makes all the difference.
Mistake #1: Gouging the Wood with High Pressure
The single most common and destructive mistake is using too much pressure. This doesn’t just clean the timber; it physically shreds the soft grain in a process called ‘furring’. Your once-smooth boards are left with a splintery, rough texture that feels terrible underfoot and, worse, absorbs deck oil unevenly. This damage isn’t something you can simply oil over. The only way to rectify a furred deck is with aggressive, professional sanding to remove the damaged layer of wood. If you’ve accidentally damaged your deck, get an honest assessment from us before the problem gets worse.
Mistake #2: Inconsistent Technique and Lap Marks
A professional finish is all about consistency. Holding the pressure washer wand too close, even for a second, creates permanent bright spots and visible lines. Stopping and starting in the middle of a board leaves ugly ‘stop-start’ marks. While these might seem minor on a wet deck, the inconsistencies become glaringly obvious once a coat of oil is applied, highlighting every single error. A professional’s experience ensures a uniform, flawless clean from edge to edge, creating the perfect canvas for a new protective coat.
Mistake #3: Washing and Walking Away
This is the biggest error of all. A deep clean doesn’t just strip away dirt and mould; it strips away any remaining protective oil, leaving the timber pores wide open. Leaving your deck in this state is like leaving a wound unbandaged. It’s completely exposed to harsh Australian UV rays and moisture, which accelerates greying, splintering, and the dreaded cupping of the boards. Remember this simple rule: a washed deck is a prepped deck, not a finished deck. The job is only half done.
After the Wash: Why Re-Oiling is a Non-Negotiable Next Step
Many homeowners think the job is done after a thorough clean. They see a fresh, raw timber surface and stop there. This is one of the most common and costly mistakes in deck maintenance. A freshly washed deck is a vulnerable deck. The cleaning process strips away not just dirt and grime, but also any remaining protective oils, leaving the timber pores open and exposed to the harsh Australian climate.
Think of it this way: washing decks is the preparation, not the protection. The real work of preserving your timber for years to come happens next.
The Importance of a Protective Coating
With its pores clean and open, your timber is thirsty for a protective coat of premium decking oil. This isn’t like painting a fence; a quality oil doesn’t just sit on the surface. It provides critical protection from the inside out.
- It penetrates deep into the timber, nourishing the wood and preventing it from drying out and cracking.
- It blocks damaging UV rays that are the primary cause of timber turning grey, brittle, and lifeless.
- It repels water and moisture, which is your best defence against the cupping, warping, rot, and mould growth that destroys decks.
How to Know if Your Deck is Ready for Oiling
Applying oil too soon or onto a poorly prepared surface will trap moisture and highlight every imperfection. Before you even open a tin of oil, conduct a professional assessment. Your timber must be:
- Completely and uniformly dry. This isn’t a job to be rushed. Wait at least 24-48 hours after washing, and ensure there are no damp spots.
- Consistent in colour. The timber should have an even, clean appearance, free from dark, patchy areas or stubborn stains.
- Smooth to the touch. Run your hand over the surface. If you feel ‘furring’ (raised, splintered grain), the timber may require a light sand for a perfect finish.
Signs You Need Professional Help, Not Just More Oil
Sometimes, even the most rigorous cleaning reveals deeper issues that a simple coat of oil cannot fix. Slapping oil over these problems is a waste of time and money, and will only lead to disappointment in a few months. It’s time to call for an expert assessment if, after washing, your deck still has:
- Persistent grey patches or deep-set stains that won’t lift.
- Boards that are visibly cupped, warped, or severely splintered.
- Flaking remnants of an old, peeling paint or a solid-colour stain that has failed.
Don’t just cover up problems; it’s a short-term fix for a long-term issue. Let us restore your deck properly.
Your Deck Deserves More Than Just a Wash
As you’ve seen, there’s a right way and a wrong way to approach washing decks. The difference lies in meticulous preparation, using the correct professional-grade cleaners, and understanding that the job isn’t finished until a protective coat of oil is applied. Cutting corners at any stage can lead to irreversible damage, turning a simple maintenance task into a costly replacement project.
A good wash can certainly revive a tired deck. But when you’re facing faded, cupped, or splintered boards, a simple clean won’t rectify the real damage. As a family business with over 17 years of Melbourne deck restoration experience, we believe in honest advice and no shortcuts. Our genuine 9-step process includes meticulous sanding for a flawless finish that a pressure washer alone can never achieve.
If your deck needs more than just a wash, don’t cut corners. Get an honest quote for a genuine restoration.
Give your deck the professional care it deserves and enjoy it for years to come.
Frequently Asked Questions
How often should you wash a timber deck?
Regularly washing decks is key to their longevity. We recommend a full professional clean and re-oil every 12 months for most timber decks. For areas with high foot traffic or full sun exposure, this may be needed every 6-9 months. This process goes beyond a simple hose-down; it properly prepares the timber, removing built-up grime and allowing the new oil to penetrate deeply for maximum protection and to prevent timber decay.
What is the best time of year to wash a deck in Melbourne?
In Melbourne, the ideal time is during the drier, milder months of Spring or Autumn. These seasons provide moderate temperatures and lower humidity, which is crucial for the timber to dry completely before re-oiling. Attempting this job in the peak of summer can cause coatings to dry too fast, while winter’s dampness prolongs drying time and encourages mould growth. Planning for the right season ensures a professional, long-lasting result.
Will pressure washing remove old decking oil or stain?
No. Using a pressure washer alone is a common shortcut that will not properly remove a failed coating. In fact, high pressure often damages the timber fibres, creating a fuzzy, splintered surface that we are frequently called to rectify. A genuine restoration requires a quality stripping agent to break down the old finish, followed by a neutralising wash. The pressure washer is merely one tool in a meticulous, multi-step process, not the entire solution.
What are the black or green spots on my deck and how do I remove them?
Those spots are typically mould, mildew, or algae, a common problem in Melbourne’s variable climate. They thrive in damp, shaded areas and feed on the old deck coating. Simply blasting them with water won’t kill the spores. A proper deck wash must include a specialised cleaning agent to kill the growth at its root. After treatment and a thorough clean, a premium coat of oil will help prevent it from returning.
Can I use this same washing method on a composite deck?
No, the process is fundamentally different. Composite decking does not require stripping and oiling. For composite materials, a specialised composite deck cleaner and a much lower, controlled pressure setting should be used. Applying harsh timber strippers or high pressure can permanently scar the synthetic surface and will likely void your warranty. Always use products and methods designed specifically for composite boards to avoid costly mistakes.
How long after washing my deck can I apply a new coat of oil?
The timber must be completely dry. This is non-negotiable for proper oil penetration. Depending on Melbourne’s weather, this takes a minimum of 24-48 hours after the final rinse. Applying oil to damp wood traps moisture, which leads to premature coating failure, rot, and cupping of the boards. We use a moisture meter for a precise reading to ensure the timber is ready, guaranteeing a finish that is built to last.
Leave a Reply