That silver-grey deck staring back at you isn’t just an eyesore; it’s a sign of timber in distress. If you’re searching for how to fix a grey weathered deck for good, you already know the quick-fix products from the hardware store don’t last. They promise a miracle but leave you with the same faded, splintery boards a season later. It’s frustrating, devalues your home, and makes you hesitant to even enjoy your own outdoor space.
Here’s the honest truth most companies won’t tell you: that grey isn’t just dirt. It’s a layer of dead, sun-damaged timber fibres. Simply pressure washing it is a temporary fix, not a genuine restoration. In this professional’s guide, we cut through the noise. You will learn the crucial steps-beyond just cleaning-that rectify the damage at its source. We’ll show you the correct process to restore your deck’s rich, natural beauty and achieve a premium, long-lasting finish that protects your investment for years to come.
Key Takeaways
- Your deck’s grey colour isn’t just dirt; it’s a sign of UV damage breaking down the actual timber fibres, a problem cleaning alone can’t solve.
- Professional sanding is the most critical step. It’s the only way to remove the dead, weathered layer and expose fresh timber for a lasting finish.
- Learning how to fix a grey weathered deck for good means focusing on meticulous preparation, which is more important than the final coat of oil.
- Applying oil over unsanded, grey timber is a common mistake that traps damage underneath and guarantees the new finish will fail quickly.
Why Your Deck is Grey (It’s Not Just Dirt)
That silvery-grey colour on your deck isn’t just a layer of built-up grime you can blast away. It’s a sign of damage. The primary culprit is constant exposure to the sun’s ultraviolet (UV) radiation, which breaks down a crucial organic polymer in the timber called lignin. Lignin is essentially the glue that holds wood fibres together; when it degrades, the fibres on the surface die and detach.
This process creates a fuzzy, porous top layer of dead wood. This layer traps moisture, creating a perfect breeding ground for mould, mildew, and eventually, rot. A simple pressure wash might remove surface dirt, but it won’t remove this damaged wood or address the underlying issues caused by these natural weathering processes. Understanding this is the first step in knowing how to fix a grey weathered deck for a result that actually lasts.
The Problem with Old, Failing Coatings
Many decks we inspect are suffering from old, patchy coatings. Instead of protecting the timber, these failing oils and stains do the opposite. They flake away in high-traffic areas while remaining in others, creating an uneven surface that traps dirt and moisture against the wood. This barrier prevents any new, premium oil from penetrating into the healthy timber below. Simply applying a new coat over this mess is a shortcut that guarantees failure within months.
Recognising Deeper Issues: Cupping and Splinters
Look closely at your boards. Are the edges higher than the centre, creating a concave or ‘cupped’ shape? This is a critical sign of a moisture imbalance, where the bottom of the board is wetter than the top. It’s a direct result of poor preparation and inadequate protection. Likewise, splinters aren’t just a nuisance; they are the physical result of those UV-damaged surface fibres breaking away. These symptoms tell you the damage is more than just cosmetic.
Step 1: The Foundation – Deep Cleaning and Preparation
Before you can restore the colour and life to your timber, you must first remove the years of built-up grime. The goal here is simple but non-negotiable: to strip away all surface-level contaminants like mould, mildew, dirt, and loose, greyed wood fibres. This is the first, most crucial part of learning how to fix a grey weathered deck correctly. Start by clearing everything off the deck-furniture, pots, barbecues, and mats. Give it a thorough sweep to remove loose leaves and debris.
A word of warning: do not use a high-pressure washer. Many DIY guides and unqualified contractors recommend this as a quick fix, but it’s a shortcut that causes serious, lasting damage. A high-pressure jet forces water deep into the timber, splintering the grain and creating a fuzzy, damaged surface that will never hold a coating properly. It’s a fast track to a failed restoration.
Choosing the Right Deck Cleaner
Household soaps and detergents won’t cut it. You need a professional-grade deck cleaner formulated for timber. There are two primary types, and choosing the right one is critical for getting a professional result.
- Sodium Percarbonate Cleaners: These are oxygen-based and are excellent for general cleaning. They effectively lift and remove organic stains like mould, mildew, and common dirt. This is your go-to for the initial deep clean.
- Oxalic Acid-Based Cleaners: Often called “deck brighteners,” these are essential for treating tannin stains and rust marks. Australian hardwoods like Merbau are notorious for “bleeding” tannins, leaving dark stains. Oxalic acid neutralises these, evening out the timber’s tone.
Always follow the manufacturer’s mixing and application instructions precisely. No shortcuts.
The Correct Scrubbing and Rinsing Technique
Once your cleaner is applied, it’s time for some genuine elbow grease. Use a stiff-bristled deck brush-never a wire brush, which will gouge the wood. Work in manageable sections, scrubbing firmly with the grain of the timber. Working against the grain will scratch and damage the wood fibres you’re trying to save. Your goal is to agitate the cleaner and loosen the surface grime. After scrubbing, rinse the area thoroughly with a standard garden hose and nozzle. This provides enough pressure to wash away the residue without damaging the timber.
Assessing the Deck After Cleaning
After rinsing and allowing the deck to dry, don’t be alarmed if it still looks patchy, faded, or dull. This is completely normal. A deep clean only removes the surface layer of dirt and dead fibres; it does not remove the weathered grey wood itself. You have simply prepared a clean slate. This foundational step ensures that the next stage-sanding-is effective, creating the perfect surface for a new coating to penetrate deeply and protect your deck for years to come.
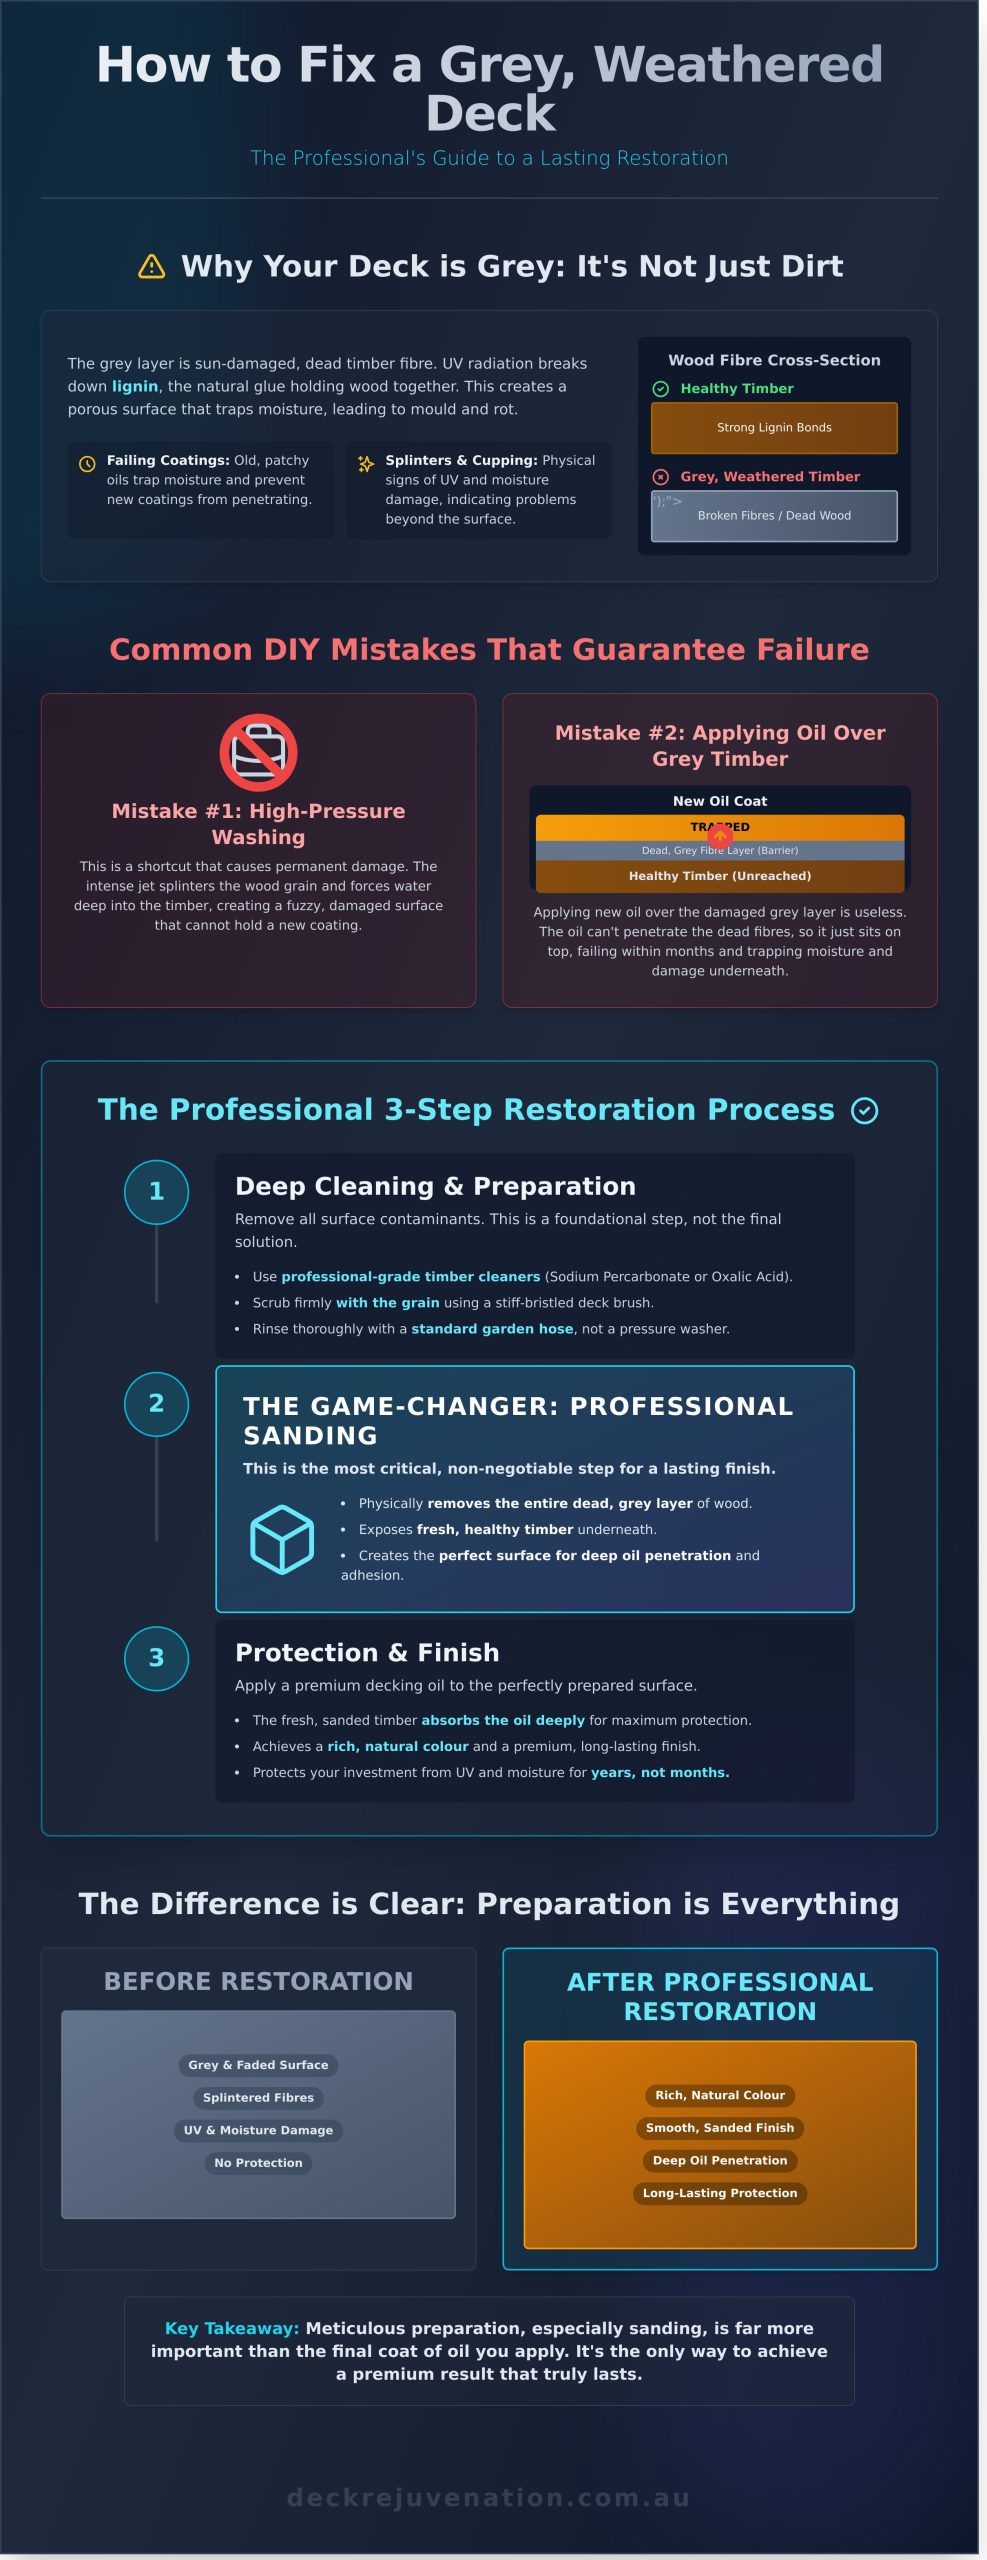
Step 2: The Game-Changer – Why Professional Sanding is Non-Negotiable
Many companies will tell you a high-pressure wash and a coat of oil is how to fix a grey weathered deck. This is a costly shortcut. That grey, splintered surface is a layer of dead, UV-damaged wood fibres. Simply coating over it is like painting over rust – the problem is still there, sealed underneath. The finish will fail in months.
The only genuine, long-term solution is to physically remove that damaged layer. Professional sanding is the single most critical step in a lasting restoration. It strips the deck back to its raw, healthy state, creating the perfect foundation for a new finish. The difference is night and day. See the difference sanding makes in our Before & After gallery.
Removing Old Coatings and Levelling the Surface
If your deck has a patchy, failing oil or stain, sanding is the only way to completely remove it and start fresh. More importantly, it allows us to rectify common structural issues. We meticulously countersink every nail and screw to prevent them from tearing our sanding belts. This precision work also lets us perform ‘decupping’ – a process that flattens warped, uneven boards to create a level, uniform surface that looks and feels brand new.
The Professional’s ‘Multi-Grit’ Sanding Approach
Fixing a grey, weathered deck properly requires a methodical approach, not a quick pass with a single machine. We use a combination of heavy-duty belt sanders for the main areas and precision edgers for the perimeter. Our process involves multiple passes, or ‘waves’, to achieve a flawless finish:
- Coarse Grit (40): This initial, aggressive pass does the heavy lifting. It strips away the dead grey fibres, old coatings, and levels out cupped boards.
- Medium & Fine Grits (60-80): Subsequent passes with progressively finer grits remove the scratches from the initial cut, leaving the timber incredibly smooth and ready to absorb oil.
The Result: A Perfect Canvas for Oiling
After our meticulous sanding process, your deck is transformed. The timber is no longer grey and lifeless; it’s a clean, smooth, and uniformly fresh surface. The pores of the healthy wood are now open and thirsty. This is the secret to a professional finish. It allows the premium oil to penetrate deep into the boards, nourishing and protecting the timber from within, rather than just sitting on the surface. This deep penetration is what guarantees a finish that lasts for years, not just a single season.
Step 3: Protection and Finish – Applying Decking Oil Correctly
After all the hard work of cleaning and sanding, this is the step that brings your timber back to life and protects it from the elements. Applying a decking oil isn’t just about colour; it’s about feeding the timber and creating a protective barrier against moisture and UV damage. This is the crucial final stage in learning how to fix a grey weathered deck properly, and it’s where many shortcuts lead to failure.
Do not proceed unless your deck is completely clean and bone dry. Applying oil to a damp deck traps moisture, leading to rot and peeling. Likewise, avoid applying oil in the direct, hot sun, as it will dry on the surface before it can penetrate. Check the forecast for rain.
For a professional result, you will need:
- A quality decking oil applicator pad
- A good paintbrush for cutting in edges and hard-to-reach spots
- Clean, lint-free rags for wiping off excess oil
Choosing a Premium Decking Oil
The market is full of options, but we almost exclusively recommend modern water-based decking oils. Unlike traditional solvent-based oils, they offer superior durability, are much faster to dry, and won’t yellow over time. Most importantly for the harsh Australian climate, ensure you choose a premium product with dedicated UV inhibitors. This is your primary defence against the sun turning your deck grey again.
Application Technique for Maximum Penetration
The goal is to get the oil into the timber, not to leave a thick film on top. Apply a thin, even coat with your applicator, working along the length of 2-3 boards at a time. To ensure deep penetration, we use a ‘wet-on-wet’ method: apply your second coat while the first is still damp (typically within 20-30 minutes, but check your product’s instructions). This allows the second coat to fuse with the first and penetrate deeper into the grain.
Crucially, after about 30 minutes, wipe off any excess oil that has pooled on the surface. If you skip this, the oil will become a sticky, tacky mess that attracts dirt and fails prematurely.
Curing Time and Aftercare
Patience is key. While a water-based oil may be dry to the touch in a few hours, it needs time to cure fully. As a general rule, wait at least 24 hours before light foot traffic and 48-72 hours before returning heavy furniture or pot plants. To keep your deck looking its best, a simple yearly clean and a single maintenance coat is all that’s needed. This is the ‘no shortcuts’ approach to long-term protection.
Getting the oiling process right is the difference between a deck that looks good for six months and one that stands protected for years. If you want to ensure a flawless, professional finish, contact us for an honest assessment.
DIY Fix vs. Professional Restoration: An Honest Assessment
After reading this guide, you might be weighing up your options. Many homeowners believe the standard approach for how to fix a grey weathered deck is a weekend project involving a pressure wash and a fresh coat of oil. While this offers a quick visual improvement, it’s a short-term fix that fails to address the root cause of the problem.
Think of it this way: slapping oil over dead, grey timber is like painting over rust on a car. It looks better for a moment, but the decay underneath continues, and the new coating will quickly fail. A professional restoration is like sanding the metal back to a clean, sound surface before applying a protective finish. One is a temporary patch; the other is a genuine, long-lasting solution.
Expected Results and Longevity
The common DIY clean-and-oil method typically looks good for 3-6 months before the greying returns and the new oil starts to peel or wear away. This happens because the oil is sitting on top of a layer of dead, weathered timber fibres. It cannot achieve deep penetration and has nothing solid to bond to. A professional, sanding-based restoration removes this damaged layer, allowing premium oils to penetrate deep into healthy timber. The result is a finish that lasts for years, not months, with simple annual maintenance.
When to Call a Professional
We believe in honest advice. A simple DIY is sometimes enough for a new deck in good condition. However, you should seriously consider professional help if:
- Your deck has significant issues like cupped, splintered, or uneven boards that require specialist levelling.
- There are extensive, peeling layers of old coatings that a simple chemical stripper won’t remove effectively.
- You lack the specialised sanding equipment and expertise needed to achieve a flawless, flat finish without damaging the timber.
- You want a guaranteed, ‘no shortcuts’ result that genuinely protects your investment for the long term.
If your deck falls into any of these categories, the most effective way to fix your grey weathered deck is with a professional assessment. For an honest evaluation and a quote for a genuine restoration, get in touch with the team at Deck Rejuvenation.
From Grey to Great: The Right Way to Restore Your Deck
As we’ve covered, that faded grey on your deck isn’t just dirt-it’s a layer of damaged, dead timber fibre. The only genuine, long-term answer to how to fix a grey weathered deck is to physically remove that damage through professional sanding. This step is non-negotiable for preparing the timber to properly absorb a protective oil, ensuring your deck doesn’t just look good for a few months, but is protected for years to come.
Deciding between a DIY attempt and a professional job comes down to the quality of the result you want. As a family business with over 17 years of experience restoring decks across Melbourne, we’ve built our reputation on honest advice and a meticulous 9-step process. We don’t take shortcuts-we deliver a finish that lasts.
If you’re ready for a deck you can be proud of, let’s talk. Get an Honest, Upfront Assessment for Your Deck Restoration. Let’s bring your outdoor space back to life, the right way.
Frequently Asked Questions
Can I just use a high-pressure washer to fix my grey deck?
Using a high-pressure washer is a common shortcut that causes more harm than good. It blasts away the soft timber grain, creating a fuzzy, damaged surface that prevents oil from penetrating properly. This is a mistake we often see from less experienced operators. The only genuine way to fix a grey weathered deck is through meticulous, professional sanding. This ensures a smooth, level surface and allows protective oils to soak deep into the wood for lasting protection.
How much does it cost to have a weathered deck professionally restored?
The cost for a professional deck restoration in Australia typically ranges from A$45 to A$65 per square metre. The final price depends on the deck’s size, current condition, and site access. A suspiciously low quote often means shortcuts are being taken, like skipping the crucial sanding step. Our pricing is transparent and reflects a meticulous process using premium materials, ensuring a result that protects your investment for years, not just a few months.
How long does a professional deck restoration take?
A comprehensive restoration is a multi-day process, not a one-day rush job. For an average-sized deck, expect the work to take 2 to 3 days, weather permitting. Day one is dedicated to meticulous preparation: sanding the boards back to fresh timber and detailed cleaning. The following days involve applying multiple coats of premium oil, with adequate drying time between each. This methodical approach ensures maximum penetration and a durable, long-lasting finish.
What’s the best way to maintain my deck after it’s been restored?
Proper maintenance is key to preserving your restored deck. Keep it clean by regularly sweeping away leaves and debris, and wash it with a gentle deck cleaner every few months. The most crucial step is re-oiling it every 12 to 18 months, or when you notice it starting to look dry. This proactive approach prevents the timber from greying again and protects it from the harsh Australian sun, ensuring the restoration lasts as long as possible.
Does the type of wood (e.g., Merbau, Spotted Gum) change the restoration process?
The fundamental process of sanding and oiling remains the same for all timber types. However, a true professional adjusts their technique for different woods. For example, dense Australian hardwoods like Spotted Gum and Ironbark require specific sanding grits and may need a different oil formulation compared to Merbau to ensure deep penetration. We tailor our approach to your specific timber, guaranteeing the correct preparation and product selection for a premium, long-lasting result.
How do I know if my deck is too damaged to be restored and needs replacing?
Most grey, weathered decks can be restored. However, replacement is necessary if you see widespread wood rot (soft, spongy timber), major structural issues like sagging joists, or deep, splintered cracks across most boards. If you’re unsure how to fix a grey weathered deck that seems severely damaged, we provide an honest, upfront assessment. We will tell you directly if restoration is viable or if replacement is the safer, more cost-effective option for you.
Leave a Reply