That one warped board you’ve been stepping over is more than just an eyesore—it’s a tripping hazard and a sign your deck needs attention. When you’re facing cupped, splintered, or rotting timbers, the path to a solution can feel uncertain. You’re likely weighing the cost and complexity of professional floorboard repairs against a DIY attempt, all while fearing a shoddy patch job from a handyman that simply won’t last through another wet Melbourne winter.
This guide cuts through the confusion. We believe in honest advice, not quick fixes. We’ll give you the trade knowledge to accurately diagnose your deck’s problems, from surface-level weathering to deeper structural rot. You’ll understand the difference between a simple board replacement and a meticulous, professional repair that rectifies the underlying cause and ensures a seamless, lasting finish. By the end, you’ll have a clear understanding of your options and the confidence to restore the safety and beauty of your deck the right way.
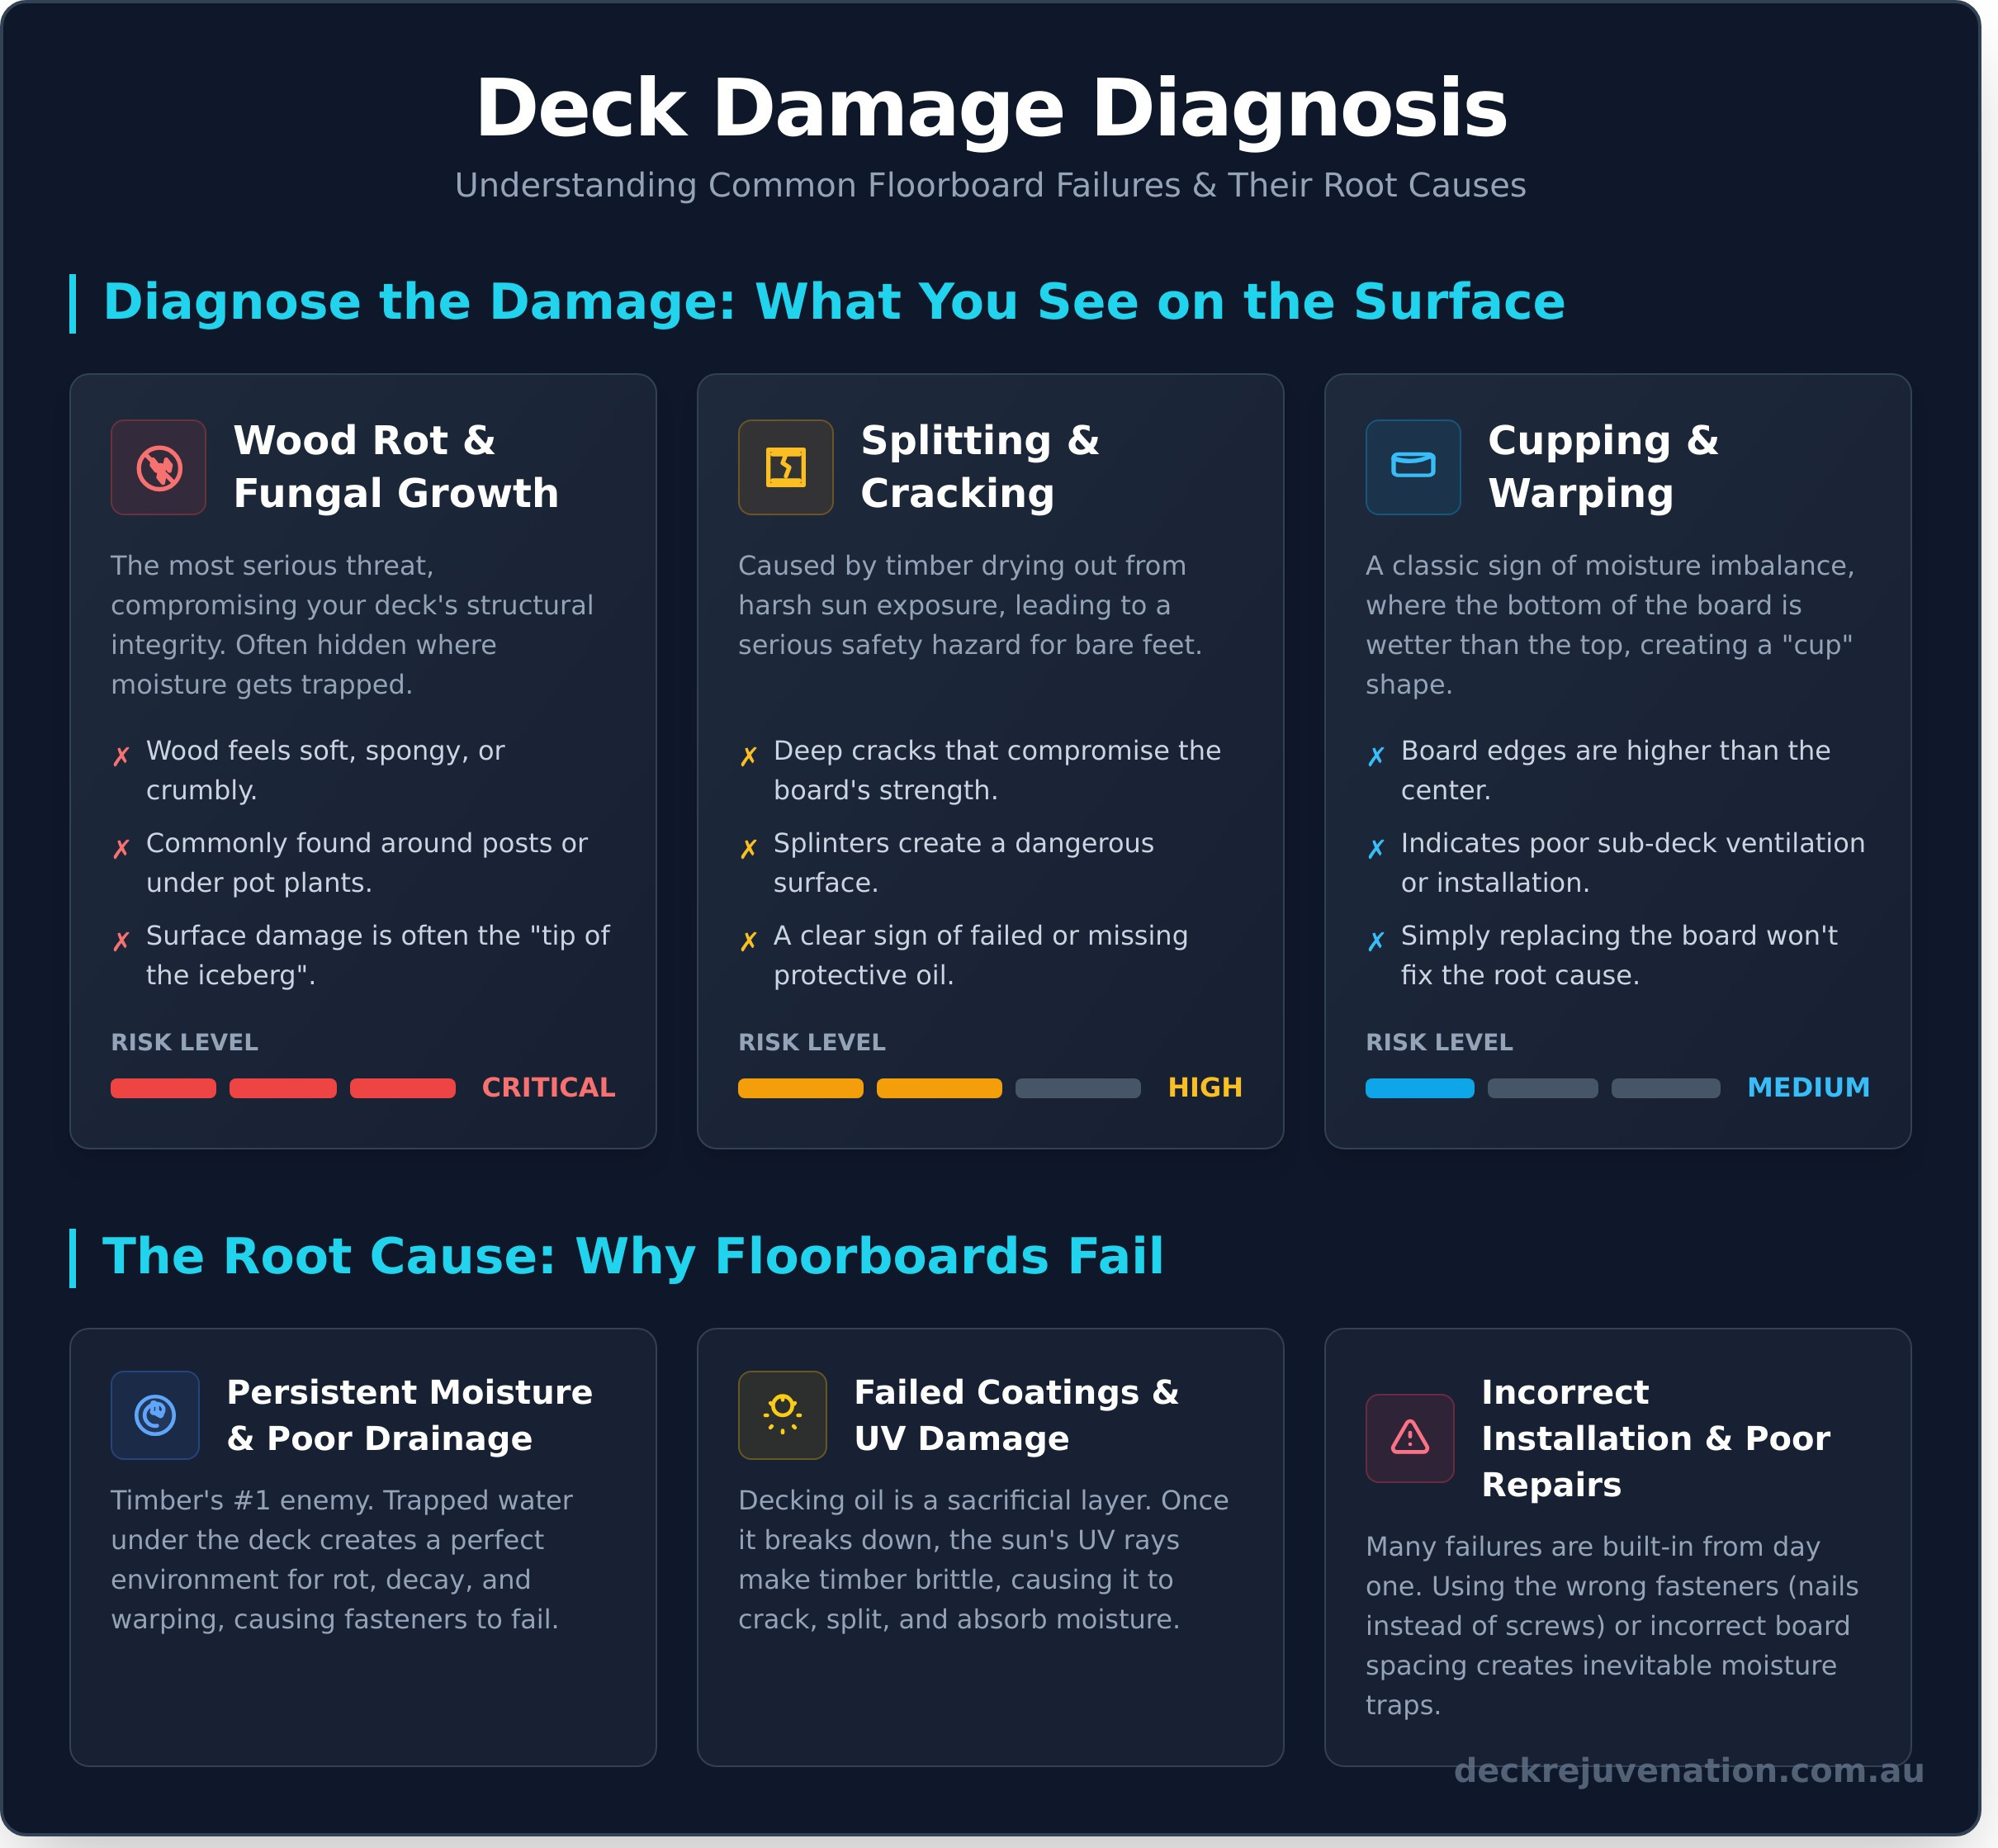
First, Diagnose the Damage: What’s Wrong With Your Deck Floorboards?
Before you reach for a single tool, a proper diagnosis is the most critical step. Attempting floorboard repairs without understanding the root cause is like patching a wound that needs stitches—it won’t last. Different problems demand different solutions. A popped screw might be a simple fix, but it could also signal a much deeper issue like a warped joist. This guide will help you inspect your deck like a professional, focusing on the common timber failures we see across Melbourne homes every day.
Wood Rot and Fungal Growth
This is the most serious issue your timber deck can face. Rotting wood won’t feel firm; it will be soft, spongy, or even crumbly under pressure. This isn’t just a cosmetic problem—it’s a direct threat to your deck’s structural integrity. In Melbourne, we frequently find it in areas where moisture gets trapped, like around deck posts, under pot plants, or where leaf litter accumulates. Be warned: what you see on the surface is often just the tip of the iceberg. Fungal decay is a complex process, and understanding the science of wood preservation shows why stopping the moisture source is the only genuine, long-term solution.
Splitting, Cracking, and Splintering
The harsh Australian sun is your deck’s number one enemy. As timber dries out, it shrinks and develops cracks. It’s important to distinguish between minor surface checking, which is normal, and deep structural splits that compromise the board. These issues are almost always caused by a lack of protective oil, which allows UV rays and moisture to damage the timber fibres. Beyond aesthetics, splintering boards create a serious safety hazard for bare feet, making the deck unusable for children and pets.
Cupping, Warping, and Twisting
Have you noticed the edges of your boards are higher than the centre, creating a concave ‘cup’ shape? This is cupping, and it’s a classic sign of a moisture imbalance—the underside of the board is wetter than the top surface. This is a red flag for poor installation, inadequate sub-deck ventilation, or both. Many companies will simply replace the cupped board, but that does nothing to fix the underlying problem. Proper, lasting floorboard repairs must address the cause, not just the symptom, to prevent it from happening all over again.
Root Cause Analysis: Why Did the Floorboard Fail in the First Place?
A popped screw or a loose board is a symptom, not the disease. Anyone can hammer a nail back in or replace a single board, but that’s a patch job, not a solution. A professional repair addresses the symptom and the cause. If you don’t diagnose why the timber failed, you’re guaranteeing it will fail again, costing you more time and money down the track. Understanding the common culprits is the first step in protecting your entire deck investment and ensuring your floorboard repairs are built to last.
Persistent Moisture and Poor Drainage
Timber’s number one enemy is constant moisture. When water is allowed to sit on or, more importantly, under your deck, it creates the perfect environment for rot and decay. Common sources include leaking gutters, poorly aimed sprinklers, or a deck built too close to the ground without adequate sub-floor ventilation. This trapped moisture causes boards to swell, warp, and “cup,” putting immense pressure on the fasteners until they eventually work loose. A genuine assessment always includes checking your deck’s drainage and airflow.
Failed Coatings and UV Damage
That beautiful decking oil is a sacrificial layer designed to protect the timber. It’s not a permanent solution. Over time, exposure to the harsh Australian sun breaks it down. An old, failed coating will crack and peel, trapping moisture against the wood and accelerating decay. Unprotected timber dries out, becoming brittle and prone to splitting and cracking around the screw holes. Simply applying a new coat of oil over the old, failed one is a classic shortcut that does more harm than good. The old coating must be meticulously sanded off to allow the new oil to penetrate and protect the timber.
Incorrect Installation or Previous Poor Repairs
Unfortunately, many deck failures are built-in from day one. Using the wrong fasteners, like smooth-shank nails instead of proper decking screws, is a common mistake that leads to loose boards. Another critical error is incorrect board spacing. Boards installed too tightly don’t allow water and debris to escape, creating moisture traps. Industry standards for fixing and spacing exist for a reason, as detailed in this comprehensive deck construction and fixing guide from the Timber Development Association. These aren’t just suggestions; they are fundamental to a long-lasting structure. This is why professional floorboard repairs often involve rectifying the original installation errors.
The Professional Repair Process: More Than Just Replacing a Board
A true craftsman understands that fixing one problem shouldn’t create another. When it comes to popped screws or damaged timber, a quick patch job is never the answer. Our meticulous process for floorboard repairs ensures the problem is rectified at its source, resulting in a uniform, level, and long-lasting finish for your entire deck. We don’t take shortcuts, because shortcuts always lead to future problems.
Step 1: Safe Removal and Substructure Assessment
First, we carefully remove the damaged board, using precision techniques to avoid harming the surrounding timber. But the most critical step comes next: a thorough inspection of the joists underneath. We check the substructure for any signs of water damage or rot. A compromised joist is a major safety hazard that must be repaired before a new board is installed. This is a vital safety check that amateurs and budget-focused companies often skip entirely.
Step 2: Sourcing and Installing the Replacement Board
Matching the new timber to your existing deck is essential for a cohesive look. We go to great lengths to source a board of the same species and similar age profile. While a new board will naturally look different until it weathers or is coated, getting the timber right is key. We then secure it with premium-grade decking screws—never nails—ensuring the new board is installed perfectly level with the surrounding deck.
Step 3: Sanding for a Seamless, Level Finish
Here’s what most deck companies won’t tell you: a new board, no matter how perfectly installed, will sit slightly proud of the older, weathered boards around it. This creates an uneven surface and an obvious patch. The only way to achieve a truly seamless result is to sand the entire deck. This not only levels the new board but also rectifies any existing cupping or unevenness across the whole surface. Our proprietary 5-wave sanding process guarantees a superior, flat finish, creating the perfect foundation for a new protective coating. It’s this commitment to a flawless result that defines genuine floorboard repairs. Find out more about our process at deckrejuvenation.com.au.
DIY vs. Professional Deck Floorboard Repair: An Honest Assessment
We built our family business on honest advice and a no-shortcuts approach. That means we’ll tell you the truth about your deck, even if it means you don’t need to hire us. While some minor fixes can be tackled over a weekend, many floorboard issues are symptoms of deeper problems that a quick fix won’t solve. Use this guide for an honest assessment of when to pick up the tools yourself and when to call a professional.
When DIY Might Be an Option
For the skilled and well-equipped homeowner, some minor fixes are manageable. If you’re confident in your abilities and your deck meets these criteria, a DIY approach could be a sound choice:
- Isolated Damage: You’re dealing with a single, straight split in an otherwise healthy board, or one loose board that simply needs new, high-quality screws.
- You Have the Right Gear: You own and are experienced with a circular saw, drill, and sander, and you understand how to use them safely and with precision.
- The Substructure is Solid: You have thoroughly inspected the joists and bearers underneath, and you can confirm they are 100% solid, with no signs of moisture damage or rot.
Warning Signs: When to Call a Professional Immediately
These are not suggestions; they are non-negotiable red flags. Attempting to fix these issues without professional expertise can compromise the safety and integrity of your entire deck. Call for expert floorboard repairs immediately if you see:
- Any Sign of Wood Rot: Even a small, soft spot is a serious problem. Rot spreads and can quickly compromise the structural safety of your deck.
- Widespread Board Damage: Multiple cracked, splintering, or cupped and warped boards indicate a systemic issue with moisture, ventilation, or the original installation.
- A Spongy or Bouncy Feeling: If the deck feels unstable, soft, or excessively bouncy when you walk on it, stop using it and call a professional. This points to serious issues with the substructure.
- You Demand a Perfect Finish: A professional has the tools and techniques to ensure the new board is perfectly level and the colour is blended for a seamless, invisible repair.
The Hidden Costs of a Botched DIY Repair
We’ve seen it too often: a small DIY job that turns into a costly, frustrating ordeal. Before you start pulling up boards, consider the real risks of getting it wrong.
- Personal Injury: Incorrect use of power tools is a leading cause of serious injury.
- Causing More Damage: Prying up one board can easily splinter or gouge the adjacent ones, expanding the scope of the repair.
- A Permanent Eyesore: Mismatched timber or an uneven board can ruin the look of your entire deck.
- Paying Twice: You could end up paying hundreds of dollars more for a professional to fix both the original problem and the new damage from the failed repair attempt.
Your deck is a significant investment. For genuine peace of mind and a result that lasts, contact us for an honest, upfront assessment of your deck’s health.
The Right Way to Repair Your Melbourne Deck
As we’ve covered, a damaged deck board is often just a symptom of a deeper issue. Simply replacing it without addressing the root cause—be it poor ventilation or incorrect installation—is a recipe for recurring problems. Understanding the difference between a simple patch-up and a comprehensive, professional solution is the key to protecting your investment and ensuring your family’s safety.
When it comes to your deck’s floorboard repairs, you deserve more than a quick fix that looks good for only a few months. As a family business with over 17+ years of experience serving Melbourne homeowners, we specialise in rectifying the tough problems others won’t touch, like cupped and damaged timber. We provide genuine, honest advice because we believe in doing the job right. No shortcuts.
Before you make a decision, understand exactly what your deck needs. Get an Honest Assessment of Your Deck’s Condition and see the difference that genuine craftsmanship makes.
Frequently Asked Questions About Deck Floorboard Repairs
How much does it cost to repair or replace deck floorboards in Melbourne?
The cost for professional deck floorboard repairs in Melbourne varies based on the extent of the damage. For minor repairs, like replacing a few damaged boards, you might expect to pay between A$400 and A$800. If the damage is more extensive and involves sub-frame issues or requires sourcing specific aged timber to match, the cost can increase significantly. We provide an honest, upfront assessment to give you a precise quote with no hidden fees, ensuring you know exactly what the job requires.
Can you repair just one section of the deck, or does the whole thing need work?
Absolutely. We can perform targeted repairs on a specific section of your deck without replacing the entire structure. However, a popped nail or a rotten board is often a symptom of a deeper issue, like a problem with the joists or poor ventilation. A proper assessment is crucial. We will inspect the entire deck frame to ensure a sectional repair is a genuine long-term solution and not just a temporary patch-up that hides bigger problems down the track.
What type of timber should be used for replacement floorboards?
The best practice is to match the existing timber on your deck to maintain a consistent look and wear pattern. Common high-quality Australian hardwoods we use include Merbau, Spotted Gum, and Blackbutt. Using properly seasoned, premium timber is non-negotiable. Using cheap, unseasoned wood is a false economy that leads to premature warping and cupping—a common shortcut we see other companies take. We source the right timber to ensure your repair lasts.
How long does a professional floorboard repair take?
The timeline depends entirely on the scope of the work. Replacing a handful of boards and securing loose fixings can often be completed within half a day. More complex jobs that require rectifying sub-frame rot or replacing a large section of your deck might take one to two full days. We work efficiently but never rush the job. Our process is meticulous, ensuring every board is perfectly level and secure before we consider the work finished.
Can you repair composite decking floorboards?
Yes, but the repair process for composite decking is different from timber. Unlike wood, you cannot sand back scratches or stains on composite boards. Repair typically means complete replacement of the damaged board. The main challenge is finding an exact colour match, as older composite boards often fade from sun exposure. We can source replacement boards and will give you an honest assessment of how closely the new section will match the old.
After the repair, how do I prevent the floorboards from getting damaged again?
Proper maintenance is the key to longevity. Ensure you keep your deck clean of debris like leaves and dirt, which trap moisture and promote rot. Most importantly, apply a premium quality decking oil every 12-18 months. This protects the timber from UV damage and water penetration, which are the primary causes of popped nails and cupping. Good sub-deck ventilation is also critical to prevent moisture buildup from below. We can advise you on a simple maintenance schedule.
Leave a Reply